Symmetri has joined Yes&.
We have some exciting news. Symmetri has decided to join the Yes& team to discover more possibilities to our clients.

We have some exciting news. Symmetri has decided to join the Yes& team to discover more possibilities to our clients.
 Posted by Chris Keller on November 8, 2013
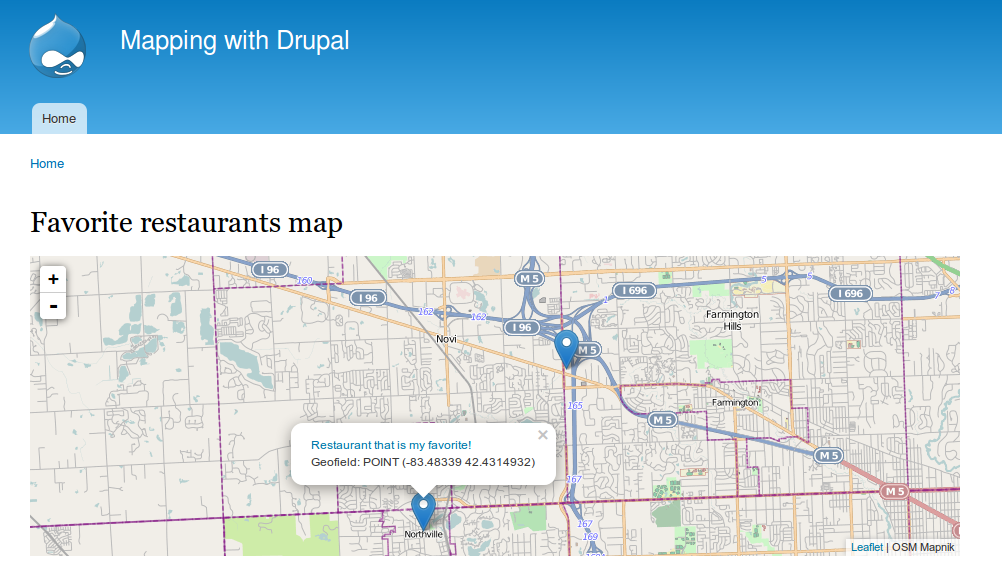
Whenever we get a project that requires creating some sort of visual map I raise my hand and yell “Pick me, pick me!”. There is something about a map that makes me feel all warm and cozy. Some maps remind us of how big the world is. Some maps are just fun to pan and zoom. Other maps represent our data far better than plain text could do alone.
Regardless of how maps make you feel there are a lot of uses for them and chances are a client of yours has wanted or will want one. Luckily, there are a lot of great resources out there for creating amazing maps with Drupal. A recent manufacturing client of ours wanted to create a map to show their current distributors. The rest of the article will walk through the basics on how that was accomplished.
Drush it up:
The first thing you will want to do is install the Leaflet library. Download the latest version of the library here. Extract this into sites/all/libraries/leaflet/dist. Create the libraries, leaflet, and dist directories if they don’t exist. Verify that the leaflet.js file is located @ sites/all/libraries/leaflet/dist/leaflet.js.
Let’s create a map that displays our favorite restaurants for this example.
Create a content type called Favorite restaurants. For mapping we need to add a couple of special fields.
Now we have a content type that will take an address and geocode it into coordinates that can be mapped. Now we need to use leaflet and views to display this. Add a few restaurants in your newly created Favorite restaurants content type before proceeding.
Time for the fun part. Create a new view.
Navigate to your newly created page which should be located at /favorite-restaurants-map. With any luck you should see the content you created earlier displayed. When you click on the pins you will see whatever fields you have set up in the view. If you want the address to show you just need to add the field in the view.
There are many more options to explore with your new map. The ipgeoloc module is pretty great and has a lot of options to play with. In this tutorial we used it to display our map but it can be used for grabbing the users location and even reverse geocoding! I chose ipgeoloc because to me it is a good balance of options compared openlayers and leaflet_views. Leaflet by itself feels too light and openlayers feels too heavy. Good luck!